Showing posts with label Diane Squires. Show all posts

Friday, September 7, 2012

Stampin' Up! Halloween Treat Box and Card


Welcome! 

Today begins the September Hopper's Blog Hop and our theme is Halloween.  Such a fun time of year...especially if you have children or grandchildren. There are cards and 3D projects to inspire you and get you thinking about the fact that Halloween is just around the corner.

There's also some blog candy for some lucky winner at the end of the month.  If you would like to play along, please leave an encouraging comment on each blog.  On September 28th a random winner will drawn from all those that have left comments.  Be sure to leave your email address so we can contact you. You'll find the links for the rest of the hoppers at the bottom of this post. 


The blog candy is 30 - 6" x 6" sheets of retired Halloween Designer Series Paper and a roll of retired 5/8" Black Grosgrain Ribbon!  


Pin It
My Halloween project is a little bit different in that it uses a non traditional orange - Calypso Coral!  I think it would be perfect for a girly Halloween...either big girls or little girls.  :)  


  • The card is a square 4" x 4" card. 
  • The spider web from the stamp set Wicked Cool has been stamped in black and then sponge lightly with Calypso Coral ink.
  • The spiders in the web and the cute little spider eyes are actually rhinestones.  All you need to do is color them with a black permanent marker.


  • The treat box is made with the Fancy Favor Die.  
  • It's so easy to construct the striped lollie with the Simply Scored Scoring Tool.
  • The strip is cut 1-1/8" x 12" and scored the length every 1/4".
  • I used a hot glue with the new Silicone Craft Mat to create the lolli.  You can use both hands and it's so easy to remove it from the mat.


Stamp Sets:  Wicked Cool (Clear 120600) (Wood 118738), Googly Ghouls (Clear 128063) (Wood 128060), Tiny Tiny Wishes (Clear 127802) (Wood 115370)
Ink:  Basic Black (126980), Calypso Coral (126983)
Paper:  Basic Black (121045), Calypso Coral (122925),  Howlstooth & Scaringbone Designer Paper (126906)
Accessories:  Calypso Coral 3/8" Ruffled Ribbon (122976), Rhinestones Basic Jewels (119246)
Cool Tools:  1-3/4" Scallop Punch (119854), 1-3/8" Circle Punch (119860), Fancy Favor Die (115965), Silicone Craft Sheet (127853), Simply Scored Scoring Tool (122334), BigShot (113439)


Saturday, September 1, 2012

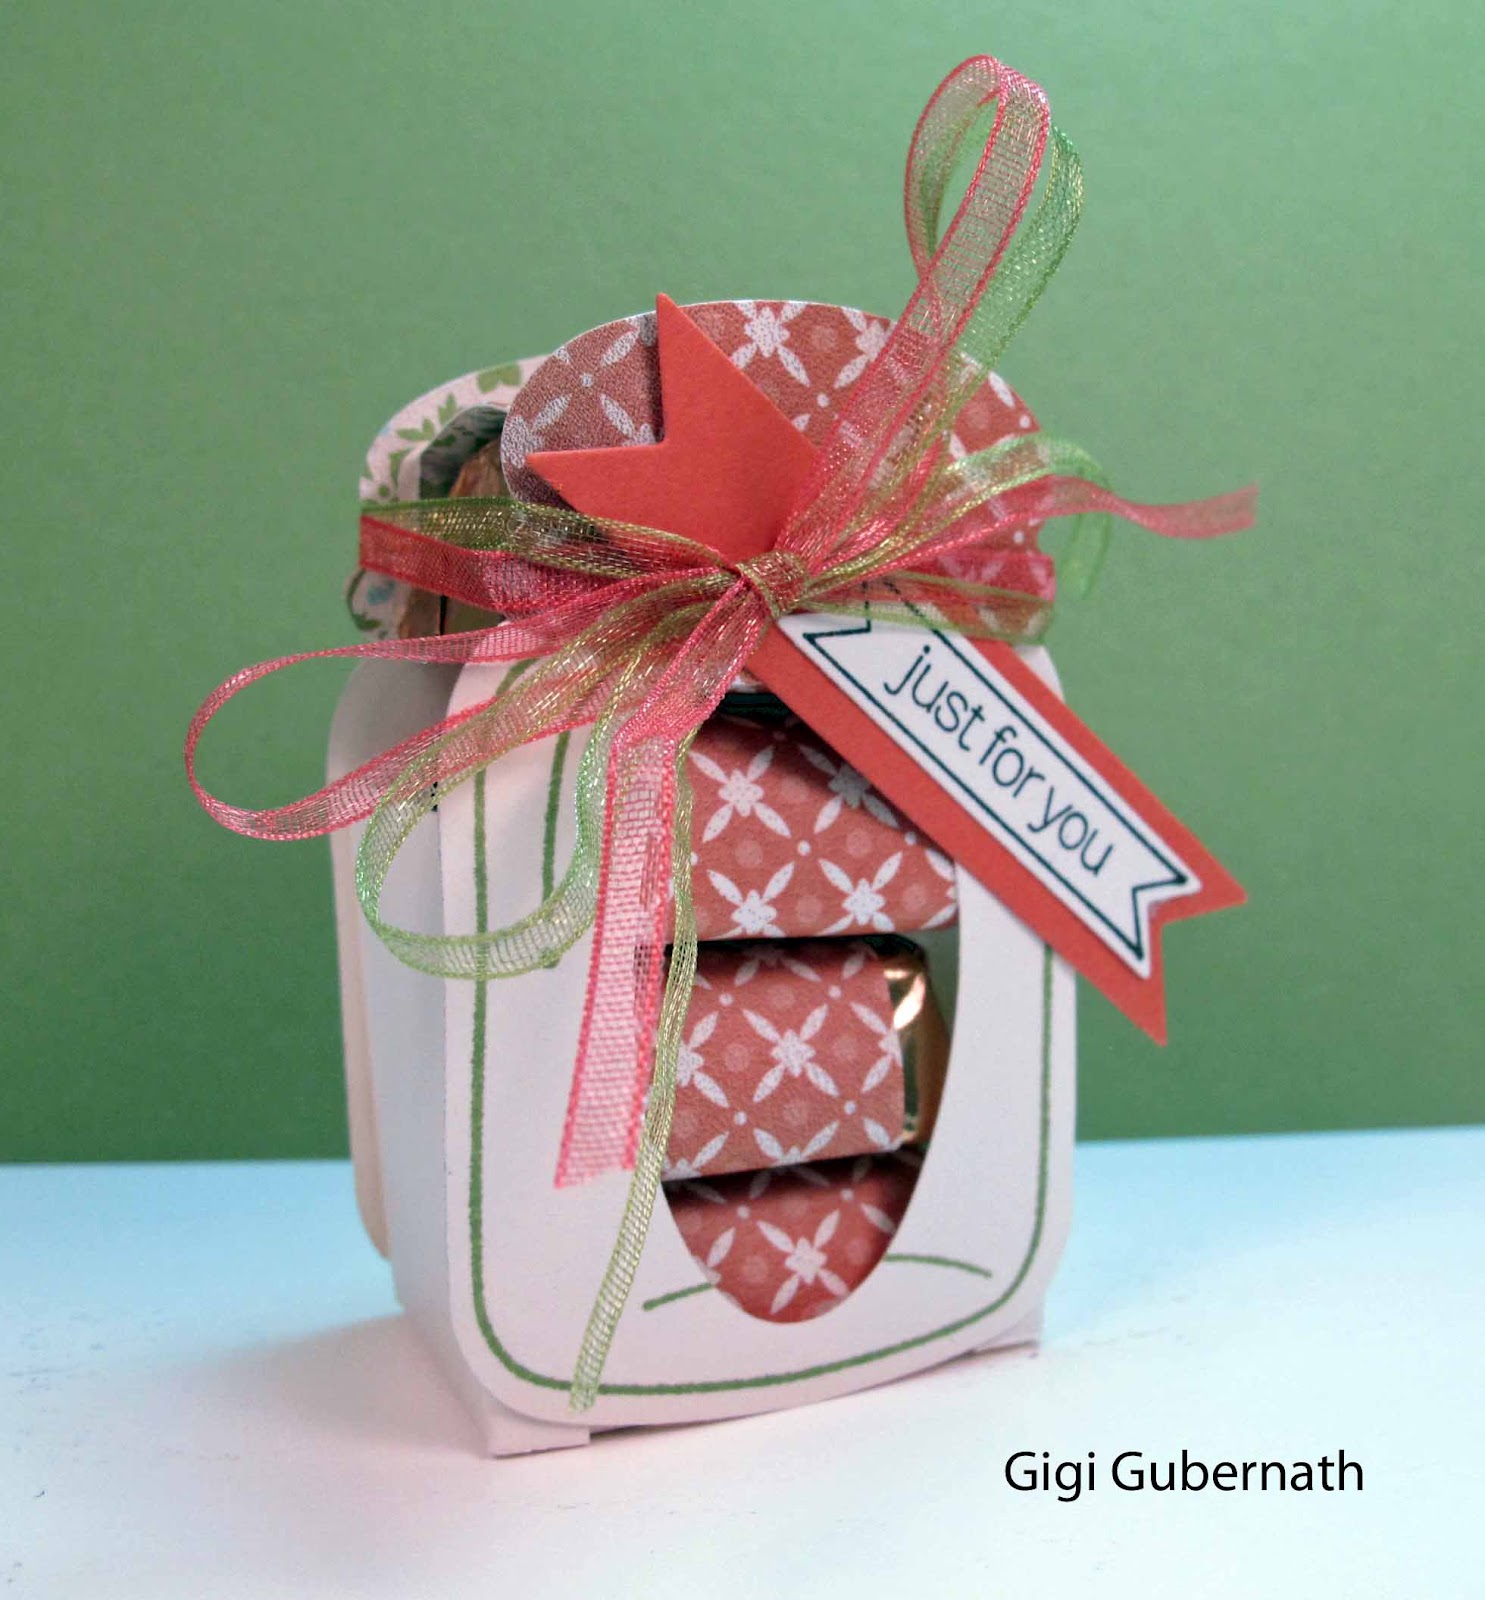
Is this not the cutest nugget holder  you've ever seen! When I received it as a little gift the other day  from Gigi, one of my team members, all I could say was Awwww!  She saw it on Pinterest....don't you just love Pinterest?  


There's a tiny box, just the right size to hold four nuggets, glued between two die cut mason jars from the Perfectly Preserved Stamp Set.  The paper Gigi used I'm sorry to say is retired.  It's the Every Day Enchantment designer series paper from this year's Sale-a-bration catalog.  Truth be told I'm sure many of us still have some around just because we loved it so much we stocked up.  I'm sure I even have some of the retired ribbon.


It would be just as cute in the new Orchard Harvest Designer Series Paper.  Or...how about some of the new Christmas Designer Series paper. Cute little treats to pass out at the office.  Everyone loves chocolate.  Or is that just me! :)


The Perfectly Preserved Stamp Set was not on my original wish list but I certainly will be adding it. How about you?

Have a wonderful weekend!  Spend at least a little bit of it stamping.


Pin It

Thursday, August 16, 2012

Scallop Folded Flower

Hi Stampers!

Beautiful morning in the North Georgia Mountains.  And...I am still continuing the celebration of my birthday week! :)  My sweet dear friend of many years is taking me to lunch and a movie today.  Since I'm running late this will be a quick share.


I created this card as my swap for the August PAWS meeting.  This flower was used in a project at convention this year.  It was in one of the extra classes that we were able to take in the evening.  It's made with the 1-3/4" Scallop Circle.
  • Punch five scallops.
  • Take 4 of the scallops and crumple them in your hand.
  • Open them out and fold each of them in half and in half again.
  • Use the extra scallop as the base and glue each quarter folded scallop to the base.
  • Make sure each folded scallop is facing in the same direction as you glue them around.
  • They should fit perfectly on the base.  If not, you can refold the the scallop so that it will fit.


Pin It
I actually created this card first for my swap and then realized that I didn't have enough of this patterned pattern paper to make all the cards.  That's what I love about this project...the color combos are endless.

The Adorning Accents Folders added a sweet extra touch to this card.  I used the small hearts across the middle.  And then added the the edge folder that coordinates with the Edgelit I used to cut the bottom of the whisper white layer.


This is is such a fun flower!  Here you can see the many layers.  The Boho Blossom Punch was used for the center with a Bitty Button and Basic Pearl.

If you decide to give this flower a try.  Let me know how it turns out or better yet email me a pic.

Gotta run!  Have a wonderful day.  Don't forget to leave a comment and share it with others.  It makes my day!

Monday, August 13, 2012

Stampin' Up! Swaps

Today I have a few swaps to share with you.  Every other month I attend our PAWS meeting.  It's a group of demos that meet at Monika Davis' house to share business tips, techniques, and swaps.  We always have a great time and I like that I come home with new things to share with my customers.  If you are a part of my downline you are invited to come to both these meetings and my downline meetings.  That's what I love about being a Stampin' Up! demo...lots of support! 


These are just a few of the swaps.  Hope to share the rest on another day.

This first card (Monika Davis) is a a fun Halloween Card using the Googly Ghouls Stamp Set in the new Holiday Mini Catalog.  I love our Googlies (eyes) as they are so easy to apply with the adhesive backing.  Love the new black and gray Stripped Satin Ribbon.


We hardly recognized LaRee's card this month.  She loves purple and there's none of her signature purple on this card. :)  She used the Papillon Potpourri Stamp Set with all the beautiful butterflies.  And... one of the gorgeous Delicate Designs Embossing Folders.


Anne's card is beautiful!  She used the Postage Due Stamp Set.  I have now seen three projects that makes me want to purchase this stamp set even though it wasn't on my original wish list.  You all know how that goes. lol


Fran's Christmas card is all pretty and glittery. :)  She used the Ornament Keepsakes Stamp Set which is a must have set for me.  Don't forget to consider the bundle with this set.  It has Framelit Dies that match all the shapes of ornaments.  When you buy the bundle you save $$ plus you can make that gorgeous ornament on the front cover of the Holiday Mini for all your special friends and family.


This last card was made by, Kim Smith, one of my club members.  She used the very colorful Summer Smooches Designer Series Paper.  I love how she just went with the colors.  My inclination was to try to tone this paper down but I love the happy feel of this card.  It makes you want to smile!  

I always encourage all my customers to bring cards and projects that they make at home to class with them to share with the group.  I think sharing is what Stampin' Up! is all about.  Plus I think it's fun for those that don't have a blog to see their cards on the web.  If you are in my local area and would like to join a great group of gals having fun with paper crafting then check out my events or contact me to find out more.  

Have a wonderful rest of your day.  Stop back often.


Pin It

Saturday, August 11, 2012

Even the Naughty Deserve Something Nice!

Cute sentiment for this sweet card using Stampin' Up!'s new Holiday Collection Framelits Dies.  I absolutely love them!  I chose the candy cane to feature in this card but you also have the choice of a christmas tree, gingerbread man, or a cute christmas mug.

Pin It
Tips and Tricks:
  • After die cutting the candy cane with the Framelit Die I used a pencil to lightly draw the outline of the candy cane on a small piece of whisper white card stock.
  • I used the Cherry Cobbler Scallop Dots Ribbon for the red stripes but for the white strips I applied Dazzling Diamonds directly to the card stock.  It gives the card some extra bling to match the rhinestones on the tag.  Oops...just realized there's a missing rhinestone on the left side.  Need to see about fixing that!
  • That's the Decorative Label Punch...cut it in half and pull it apart as far as you need to.
  • If you don't have the new Essentials Paper-Piercing Pack you need to consider it.  I love how you can pierce half the card, turn it around and pierce the other half.  No more lining things up over and over again. :)
This is one of the cards that we are making in club this month.  There are still some spots for tomorrow's class (2:30pm) and the Thursday evening class (6:30).  If you live in the area and would like to join us we would be happy to have you.  No experience necessary!  A great group of gals that have a passion for paper crafting.  All skill levels welcome!


Wednesday, August 8, 2012

Embossed Papillon Potpourri Card

Hi Everyone!

The card I have to share with you today I originally thought I would be posting as part of my blog hop post the other day but...

I chose the wrong color blue when designing the card.  Instead of pulling bashful blue I grabbed Baja Breeze.  It doesn't make me like the card any less (lol) I just had to wait until today to share it with you.


Pin It
Decided to go with a more vintage feel with this card.  
  • Dry Embossing every layer and then sponging with Crumb Cake ink gives this card lots of texture. 
  • You'll find the new Lacy Brocade Embossing Folder that I used on the Crumb Cake layer in the new Holiday Catalog.  I can tell it's going to be one of my new favorites!
  • This is Stampin' Up!'s new Butterfly Punch and it coordinates perfectly with the Papillon Potpourri Stamp Set.  
  • I'm into pearls right now which is always a perfect vintage touch.
I was asked to choose my favorite embellishment  at a meeting last week and that's really difficult with all that Stampin' Up! has to offer right now. I did however choose....pearls.  How about you?  Would love to hear from you...leave a comment sharing your favorite embellishment.


Before I leave you today I  want to share this cute upbeat video.  My birthday's today and I'm wondering if I'll have a digitally created birthday party like in the video.   Probably not... but what I really wanted for my birthday is My Digital Studio 2 Plus instead of just the upgrade.  

I'm happy to say ...my sweet mom gave me My Digital Studio 2 Plus for my Birthday...AWESOME!  As soon as I finish here I hope to get it downloaded! Happy Birthday to Me!!!

Download a 30-day FREE Trial today and check it out!

Have a wonderful day!


Stamp Sets:  Papillon Potpourri (Clear 123759), (Wood (123757),  Teeny Tiny Wishes ( Clear 127802), (Wood 115370)  Affection Collection (Clear 127949), (Wood 127946)
ink: Real Red (126949), Crumb Cake (126975)
Paper:  Card StockReal Red (102482), Baja Breeze (111352), Crumb Cake (120953) 
Tools:  Embossing Folders - Lacy Brocade Folder (127819), Perfect Polka Dots Folder (117335), Elegant Lines Folder (119277), Labels Collection Framelits (125598), Elegant Butterfly Punch (127526), Paper Snips (103579)
Accessories:  Crumb Cake  1/2" Seam Binding Ribbon (122332), Whisper White Baker's Twine (124262), Pearl Basic Jewels (119247), Stampin' Dimensionals (104430), Glue Dots (103683)


Monday, August 6, 2012

Hopper's Blog Hop - Color Coach Combo


Welcome to the August Hopper's Blog Hop!  We're having fun with color this hop so come join us!  There's a prize this month of (24) 6" x 6" pieces of Staminp' Up! Designer Series Paper (current and retired).  All you need to do is visit every blog in the hop and leave a comment.  There will be a random drawing at the end of the month. Leave your email address with your comment so we can contact
                           you or check back on the 27th.                      


Pin It

Are you familiar with Stampin' Up!'s Color Coach?  Do you use it!  I love mine.  It's a great tool when your creativity feels "stuck". Choose a color and let the coach suggest two different combinations.  

Real Red was chosen for our Hopper's Challenge and I chose the Getting Started Combination.  It's a combination I probably wouldn't have thought of on my own...Real Red, Early Espresso, and Pumpkin Pie?  But look how cute it turned out!  

The Ronald McDonald stamp set, Moving On has been getting a work out in my stamp room.  I just think it's so much fun for both kids and adults.  I also love that $3 of the price of the stamp set is donated to the Ronald McDonald House Charities where they help support families with children who have serious illnesses.  

Purchase the Moving Forward Stamp Set through my online store and receive a Free video tutorial for a matchbook gum or candy holder pictured here.

We hope you'll be inspired to create your own card using either this color combo or the creative combo...Real Red, Bashful Blue, and Crumb Cake. Email me a picture and I'll post it on my blog.


Stamp Set:  Moving Forward (Clear 126322, Wood 126320)
Ink:  Real Red (126949), Pumpkin Pie (126945), Early Espresso (126974)
Paper:  Card Stock - Pumpkin Pie (105117), Early Espresso (119686), Real Red (102482), Brights Designer Series Paper Stacks (117155)
Tools:  Large Scallop Edgelits (127019), Itty Bitty Shapes Punch Pack (118309), Paper Snips (103579)
Accessories:  Rhinestone Basic Jewels (119246) 


Glad you stopped by today.  Don't forget to leave me a comment...and then go visit the other sites listed below.

Friday, August 3, 2012

Convention - Stampin' Up! Sample Boards

Today I wanted to share some more pictures of samples form Convention. These projects come from the Stampin' Up! product boards...I hope.  My pictures are so mixed up.  I thought I had everything organized put after downloading pics from other people my Photoshop Elements Organizer is a mess.

There were all types of projects.  I loved the boards with all the different ways to make flowers so I included a few here.  The variety was amazing! The My Digital Studio Projects would make you want to sign up for the free trial right now!  Actually I bought MDS2 Plus this morning!

So take a peek and every so often I will post some more of my convention pictures.


Pin It