Monday, February 27, 2012

MoJo Monday Shamrocks

Today I decided to create a card for the MoJo Monday Sketch Challenge. The sketch is below.  You can make a round or square card and I decided on a square St Patrick's Day Card.  I really don't have any stamps for this occasion so I decided to improvise.

A Shamrock is a low growing, clover-like plant, with three-lobed leaves, that are the national emblem of Ireland (looked that up).  And as we all know when you find one with 4 lobes you are in luck!  I remember as a kid our entire front lawn was covered in clover.  Back then I didn't know that wasn't a good thing. :) I remember sitting sometimes for hours on a summer day looking for a four leaf clover and being ecstatic when I found one. Taking it inside so my mother could press it between wax paper so I would always have luck. <3

Today's card features that one lone lucky shamrock among all the rest.  I used the smallest heart on the Heart to Heart Punch to make the lobes and then glued them onto the circle in the Itty Bitty Shapes Punch Pack.  The stems were made using the small oval punch.

The paper is Lucky Limeade card stock and the Twitterpated Designer Series Paper.  The sentiment is from Friendly Phrases and inside I stamped "Got Green?" from the Got Treats Stamp Set.


Pin It


Take a look at the sketch, visit the Mojo Monday site for some additional inspiration, and join the challenge!

Have a wonderful evening!


Stamp Sets: Friendly Phrases (W126151) (W126149), Got Treat (for the inside) (C120627) (W119114)
Ink:  Basic Black (101179)
Paper:  Lucky Limeade (122926), Whisper White (100730), Basic Black (121045), Twitterpated DSP (125406)
Tools and Accessories: Heart to Heart Punch (119881), Itty Bitty Shapes Punch Pack (118309), Scallop Trim Border (118402), Basic Rhinestones (119246), 5/8" Organza Ribbon-Whisper White (114319), Dimensional (104430), Glue Dots (103683)


Shop In My Online Store 24/7

Leaving a comment makes my day. :)

Friday, February 24, 2012

Everybunny Hot Air Balloon

The weather yesterday in the north Georgia Mountains was gorgeous! Almost like a spring day.  It's confusing some of the flowers in the neighborhood but it was a great day to trim back my Knock Out roses.  I was told this was the time of the year to do that.  Hope so...I'm more of a stamper then gardener. :) 

Today's project makes me think of a beautiful spring day...an Easter Day. This little bunny is happily floating along on a gorgeous day spreading lovely flowers all over the land. :)  That reminds me of a game I used to play with my boys where we each added a line to the story.  They used to come up with some pretty strange twists in the story. Sorry...I'm digressing.

Thought this card might work for this week's challenge at The Outlawz if I can find the time to actually post it before they are on to the next challenge.  Come join the fun.

Pin It
  • When you are using layers of the same color on a card it's good to add some texture.  This is easily done with Stampin' Up's many embossing folders.  I find it difficult to even make a card without using my Big Shot to either emboss or die cut.
  • Coloring an image can be done many ways.  Today I chose to use my ink pads and a blender pen.  Just squeeze on the ink pad before opening and when you open it there will be enough ink on the inside plastic to use with your blender pens.
  • I wanted to have the flowers look like they were actually falling to the ground so I used one of the punches in the Itty Bitty Shapes Punch Pack to add the extra flowers.


Stamp Sets:  Everybunny (C122707), (W122705)
Ink:  Chocolate Chip (100908), Pool Party (122938), Calypso Coral (122939), Lucky Limeade (122935)
Paper:  Very Vanilla (101650), Pool Party (122924), Calypso Coral (122925)
Tools and Accessories:  Itty Bitty Shapes Punch Pack (118309),  Square Lattice Embossing Folder (119976),  Big Shot (113439),  Blender Pens (102845),  Very Vanilla 1/8" Taffeta Ribbon (119960).
Basic Pearls (119247), Dimensionals (104430)


Just a reminder...Stampin Up is now offering a My Digital Studio 30 Day Free Trial.  Perfect to see if it's right for you.  There are so many ways to use the program and it's easy to learn.  There's lots of training and support from our My Digital Studio Site.  Check It Out!


Remember to go through my online store to order either the trial or the actual software.  Local customers - I am offering a Free class to get you up and running.


Thursday, February 23, 2012

Everyday Enchantment 3 x 3 Post It Note Holder

My project today is a cute 3x3 Post It Note Holder.  Perfect when you need a little gift.  Who doesn't use Post It Notes?  The colors are Pool Party and Lucky Limeade with the Everyday Enchantment DSP used in the flower.

Pin It

  • The Lucky Limeade Base is 3-1/4" x 6-5/8" - Scored at 3-1/8" from each end or if you have a Simply Scored Scoring Tool score at 3-1/8" and 3-1/2".  
  • The Very Vanilla and Pool Party strips are 1-1/2" and 7/8"wide by 3-1/4".  
  • I used the 5-Petal Flower Punch for the flower.  It's a great punch to have in your "tool shed".  Same for the Scallop Trim Border Punch.  
  • I die cut a small button in Lucky Limeade to put behind the clear Bitty Button.  
  • The flower petals were sponged with Crumb Cake Ink for added dimension.  


Stamp Set:  You're My Type (125650)
Ink:  Chocolate Chip (100908), Crumb Cake (121030)
Paper:  Everyday Enchantment DSP (126154-SAB), Lucky Limeade (122926), Pool Party (122924), Very Vanilla (101650)
Tools: Scallop Trim Border (118402), 5-Petal Flower Punch (119880), Simply Scored Scoring Tool (122334), Sweet Buttons Embosslits Die (121813) Big Shot (113439)
Accessories:  Bitty Buttons (118761), Lucky Limeade Baker's Twine (125572) 


Tuesday, February 21, 2012

Vintage Flap Card

As promised, here is the swap card I made for my downline meeting.  Right now we are meeting every other month to share and be inspired.  I wanted to work on a vintage looking card  so I went straight for "my favorite" designer series paper.  Everyday Enchantment DSP is a beautifully designed paper with some of the greatest patterns.  If this paper is on your wish list remember it's free when you place a $50 order during Sale-a-bration.  You have until the end of March.

Pin It

I used a CD to round the flap.  Placed it 1 1/2 inches from the top, traced, and cut by hand.  Lots of sponging with Crumb Cake ink.


When you lift the flap you find yet another coordinating paper.  Did I tell you how much I love this paper. :)  I didn't stamp the inside.  That way my downline and I could stamp the sentiment we wanted when we decide to send the card.


Stamp Set: Fresh Vintage (C125117), (W125115), Loving Thoughts (C125845), (W125843)
Paper: Everyday Enchantment DSP (126154), Lucky Limeade ( 122926), Very Vanilla (101650)
Ink: Chocolate Chip (100908), Crumb Cake (121030)
Accessories: Blossom Punch (125603), Blossom Bouquet Triple Layer Punch (122464), Designer Printed Brads (122940), Big Shot (113439), Stamping Sponges (101610), Dimensionals (104430 

I'm having lunch and seeing The Vow today with a very special friend.  I know I'm going to have a wonderful day!  Hope you have a great one too.  

Click Here to order from my online store 24/7.  

Sunday, February 19, 2012

The Fashionable Hearts Embosslits

I'm excited!  Some of my downline will be coming over this afternoon to stamp and swap cards.  We always have a lot of fun stamping and sharing. I love the swap card I made and thought about sharing it with you today. Problem is...I'm afraid they may visit my blog before the meeting and it will spoil the surprise.

So today I decided to share this cute clean and simple 3"x3" note card that features the Fashionable Hearts Embosslits.  They are a new product in the Occassions Mini Catalog.  The die, cuts and embosses all at once, when you run it through the Big Shot.  There are six different sizes of hearts each with a different embossing pattern.  They range in size from small to tiny.

This card uses one of the larger hearts with the polka dot embossing pattern.  Each heart was folded in half before being glued in a flower pattern.  Lots of dimension and texture.  A fun little note card to have on hand.

Have a wonderful day and stop back tomorrow to see my swap.  It features the Everyday Enchantment Designer Paper.  


Pin It

Saturday, February 18, 2012

A Stampin' Up! Sneak Peek

Have you been wondering where I've been the past couple of days?  In Atlanta - babysitting!  Actually puppy sitting.  Isn't he cute!  His name is Hemingway and he's my youngest son's new puppy.  It was difficult to get a clear shot because he doesn't sit still for a minute.  Even when it looks like he might be still - he's not!   I thought I would get some stamping done or maybe work in My Digital Studio...well guess again.


Look at the size of those paws he needs to grow into. :)


He bites and chews on EVERYTHING!!  Including shoes, pant legs, hands, phones, computer wires, and the list goes on.  Needless to say, I came home exhausted.

So when I opened my mailbox last night to find this lovely card from a fellow demonstrator, Michele Schmidt, I was so excited.  First that she thought of me and second that I didn't need to sit down and stamp something to share today. :)  Michele was one of the lucky prize patrol winners at Leadership that received the new Diagonal Scoring Plate that fits on the Simply Scored Scoring Tool.  It's going to be a great tool for box and envelope making.  But you will also be able to use it to add texture and dimension to your cards.  As a demonstrator I will be able to pre order this new product in a couple of days and it will be available to everyone else on March 1.


Are you wondering what stamp set this is?  It's a new one that won't be available until the new catalog comes out in June.  We all received one of the Everything Eleanor  stamp sets at Leadership - free.  I love the perks of being a Stampin" Up! demonstrator.


If at anytime you have thought about becoming a demonstrator now is the perfect time. The Starter Kit is only $125 and it includes so many products to get you started in your own business whether full or part time.  If you're a new stamper it's a great way to purchase the basic, paper, ink, and tools to get you started.  Besides the great price Stampin' Up! is also throwing in some additional freebies.


For more information or to sign up now Click Here.

Pin It

Tuesday, February 14, 2012

P. S. I Love You!


Happy Valentine's Day Everyone!


I hope your day is filled with love and lots of chocolate candy!

Pin It

Monday, February 13, 2012

In my club and classes I like to encourage everyone to stamp at home and bring their projects in each month to share with each other.  You actually get an extra raffle ticket placed in the basket when you have a show and tell.  Sometimes they worry about the fact that they copy ideas from others.  Do you do the same thing?  Well my answer to them is...to CASE (copy and share everything) is a form of flattery as long as you give credit where credit is due.

This week Leishman Williams brought not one but three cards with her and I would like to share them with you.  She loves to stamp and learn new techniques.  There are a few products that are not Stampin' Up! as many of my club members are new to Stampin' Up!.  But they do have long wish lists! :)

In this first Valentine card I noticed that the heart from the P. S. I Love you Stamp Set looked larger.  Well that's because she doesn't own that set yet and so she downloaded it to My Digital Studio and made the heart the exact size she needed, to fit one of the Heart Framelits Dies.  Just another reason why you should download the 30 day free trial of this program and give it a try.


If you visit my blog often this second card may look familiar to you. Leishman cased my Hopper Valentine Hop card using the supplies she had available.  She wanted to make a card using her new wheel - Baroque Border.  (By the way, today is the last day to participate in the hop and have a chance to win a prize of Stampin' Up! products.  We draw the winner tomorrow.)
  

We are all loving the Mixed Bunch Stamp Set with the coordinating Blossom Punch.  With it being so cold outside the past couple of days this card helps me to remember that spring and summer are just around the corner.  

Since I don't know where she saw the original cards (except mine) I can't give the creator credit but want to thank them for sharing.

So have you been buying stamps and letting them sit in a closet?  Or have you been told you're not a stamper you're a stamp collector! :)  Well I want to encourage you to dust them off and make a hand stamped card for someone you love.  Picture them going to the mail box and finding something other then more bills.  Does it bring a smile to your face?  Well it will bring a smile to their face too!

If you live in the Jasper, Canton, Ellijay area I would like to invite you to one of my upcoming classes or check out the Product and Technique Club.

Keep warm and have a wonderful day!

Sunday, February 12, 2012

Up in the Air - Stampin' Up! Hostess Stamp Set


Today I would like to share another card that my club members are making this afternoon.  In a previous post I mentioned that the two techniques I would be sharing this month are masking and reverse masking.  This Clean and Simple card uses reverse masking.


The idea behind reverse masking is to create an area where you are going to stamp your image and cover up everything around it.  I like to use a post it note or if I need to cover up a larger section, like in this card, I use a piece of copy or printer paper.  I find that works much better then using another piece of card stock because your stamped image close to the mask stamps cleaner and clearer.

To make the mask I used a piece of printer paper close to the size of the white layer and then punched a 1 3/4" circle approximately where I wanted the image.   I just held the mask in place ( you can use re-positional Dotto if you would like) and sponged in the circle.  Still holding the mask in place I then stamped the image.  

I used the Stamp-a-ma-jig to stamp the sentiment so I could get it perfectly straight...well, nearly perfect. :)


I decided to stamp and color the full image on the inside. 

One more thing...did you notice the little blue rhinestone "egg" in the nest? How cute is that!  If you didn't - go back and take a look.  

You may already know that you can color our rhinestones but if you don't let me tell you how.  Just lightly touch any color permanent marker to the rhinestone and voila ! And the best part is...they still sparkle.

Have you colored any of the rhinestones in your projects yet?  Or is this something new you learned today?  Please leave a comment - It makes my day. :)


Stamp Set: Up in the Air (C122477), (W122475),  Three Little Words (W113254)
Ink: Baja Breeze (111833), Chocolate Chip (100908), Old Olive (102277)
Paper: Baja Breeze Card Stock (111352), Whisper White Card Stock (100730)
Accessories: 1 3/4" Circle Punch (119850), Stamp-a-ma-jig (101049), Blender Pens (102845), Basic Rhinestones (119246)

Saturday, February 11, 2012

Playful Posy Punch


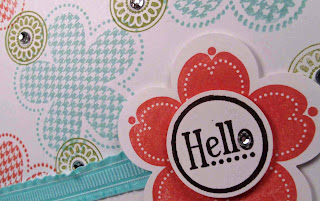
Today's card is a bright playful card that again uses the hostess set Posy Punch.  I was asked by my club hostess this month to feature hostess stamp sets used in different ways.

The top was randomly stamped in three colors, Pool Party, Calypso Coral, and Old Olive using reverse masking.  And what that means  is that I used a piece of computer paper to cover or mask the bottom of the white layer before stamping the top.

What turned this card from cute to super cute is the rhinestones.  When I'm not completely satisfied with a card I'm designing I can often fix that by adding the bling!  But not too much.

Do you love bling?  What's your favorite - rhinestones, pearls, glitter...?  A comment makes my day. :)


Stamp Set: Posy Punch (C122482), W122480)
Ink: Calypso Coral (122939), Pool Party (122938), Old Olive (102277), Basic Black (101179)
Paper: Pool Party (122924), Whisper White (100730)
Accessories: Pool Party 3/8" Ruffled Ribbon (122975), Fancy Flower Punch (118073), 1" Circle Punch (119868), Basic Rhinestones (119246)


Pin It

Friday, February 10, 2012

Posy Punch - Technique Masking

It's Friday!  Hope you're having a great one.  Do you have fun plans for the weekend?  Do they include stamping?  

I had a club meeting this morning and have another on Sunday so I will definitely be in my stamp room.  The best part is that I get to hang out with some of my favorite people. :)

I teach a technique or share a product each month which is fun because I get to watch my new stampers as they discover all you can do with stamps, paper, and ink.  They are often quite surprised when they see their finished creations.  

This card uses the hostess set Posy Punch and it is a fun way to teach masking.   I know all you advanced stampers out there use this technique often but most of my stampers are seeing it for the first time.  The real red flower is stamped first in the center of the card stock and then again on a sticky note.  Cut the one on the sticky note out and stick it on top of the one on the card stock.  Use some re-positional Dotto if you feel the need. Then when you stamp the Daffodil Delight flowers it looks like you stamped them behind the real red one.  I remember when I learned this technique...and what an ah-ha moment it was!


Some paper piercing, rhinestones, and the simple Hello popped up with dimensionals and you have a cute clean and simple card that can be used for many occasions.  


Stamp Set:  Posy Punch (C122482, W122480)
Ink:  Real Red (103133)  Daffodil Delight (119667, Basic Black101179)
Card Stock: Real Red (102482), Whisper White (100730)
Accessories: Paper-Piercing Tool (116631, Mat Pack (105826),Basic Rhinestones (119246)


Here's a sneak peek of tomorrow's card using the same set but this time with reverse masking. 

So...is masking a technique you use often?  Is it one you learned early on or is this the first time you've seen it and did you have that ah-ha moment when you discovered that's how you get this look?  Please leave a comment...


Remember...during Sale-A-Bration it's only $125 to become a new demonstrator!  This is a package valued over $340!  

Customers Enjoy Fabulous Products, Hostesses Enjoy Free Products -
  Demonstrators Enjoy These and So Much More!
  • Product Discount
  • First to buy Products
  • Lasting Friendships and Fun
  • Extra Money
Join my team today!  
Feel free to email or call me to get answers to your questions and to learn how I will support you to reach your goals.  No matter if those goals are for the free starter kit, product discounts, or to earn extra money. 

Pin It